Have you ever noticed the shimmering light patterns at the bottom of a swimming pool or the way sunlight bends through a glass of water? These beautiful effects are called caustics—the result of light being bent or reflected and then concentrated onto a surface. In the world of 3D rendering, caustics play a big role in making scenes feel realistic and visually stunning. Whether you’re creating an architectural walkthrough, a nature scene, or an interior with reflective surfaces, caustics help bring your project to life.
As a designer or visual artist, you may have found that simulating caustics is often complicated and time-consuming. Traditional rendering engines can take hours to process these effects accurately. But with D5 Render’s real-time caustics feature, things have changed. We introduced real-time caustics support with a much simpler setup, giving you high-quality results in just a few clicks.
In this blog, you’ll learn what water caustics are, why they matter, and how D5 Render makes it easier than ever to use them. If you're aiming for next-level realism in your renders, this is a feature you definitely don’t want to miss.
🔔 Explore the free D5 Render now!
Key Takeaways on Water Caustics in D5 Render
Unlocking the Magic of Water Caustics: How Light Transforms Your Scenes
1.1 Explained: The Science Behind Water Caustics
Water caustics are the bright, curved patterns of light that form when sunlight passes through or reflects off water surfaces and focuses on another surface. Scientifically, caustics occur when light rays bend (refract) or bounce (reflect) and then concentrate on a surface, creating patterns that are often sharp and luminous.
There are two main types of caustics: reflective caustics and refractive caustics. Reflective caustics happen when light bounces off shiny or still surfaces like glass or calm water. Refractive caustics occur when light passes through transparent objects like glass, curved plastic, or rippling water. In the case of water caustics, both reflection and refraction are usually at play, especially when water is in motion or uneven.
Real-world examples include sunlight filtering through a glass of water and creating a light pattern on a table, or the glowing wave-like designs you see under ocean scenes in movies.
1.2 The Role of Water Caustics in Creating Realistic Renders
In architectural and landscape visualization, water caustics are more than just a nice visual touch — they’re essential for creating believable scenes. When you use caustics correctly, your renderings feel more alive and immersive. You’re not just showing a body of water; you’re showing how that water interacts with light and its surroundings.
Including water caustics in your scenes can boost realism by adding natural lighting effects that your viewers subconsciously expect to see. With the introduction of its real-time caustics feature, D5 Render lets designers like you add realistic caustic effects effortlessly—no complicated setup required.
🔔 Learn more About How to Create Caustics in Real-time Rendering →
🔔 Experience the free D5 Render immediately!
1.3 Challenges of Rendering Water Caustics
Rendering water caustics is one of the most impressive yet technically demanding effects in computer graphics. If you’ve tried to simulate the shimmering light patterns under water, you know how tricky it can be.
A. Computational Load
Water caustics involve light bending and bouncing through transparent materials like water. These interactions are complex, and simulating them accurately needs a lot of processing power. Traditional rendering engines rely on ray tracing or photon mapping, which can slow down your workflow. This level of detail used to be far from real-time — until now.
B. Setup Complexity
Getting caustics right often means fine-tuning many parameters — from light source angles to material roughness. In older software, it’s easy to get lost in the settings. D5 simplifies this by making caustics a built-in, toggleable feature, especially for light types like point, spot, and rect lights.
C. Rendering Time
Finally, high-quality water caustics can increase render times significantly. That’s a big problem if you’re working on tight deadlines. Thankfully, D5 Render's real-time engine balances speed and quality, so you can preview and adjust your scene on the fly without waiting hours to see the results.
D5 Render’s Approach to Water Caustics
2.1 Why Choose D5 Render?
If you're an architect, interior designer, or 3D artist, you know how essential it is to create realistic scenes quickly and efficiently. That’s exactly where D5 Render stands out. It’s a powerful real-time rendering software designed to give you high-quality visuals without the complexity of traditional tools. D5 Render combines fast performance with an intuitive interface, helping you focus more on design and less on setup.
🔔 Experience the Free D5 Render Immediately!
2.2 Real-Time Water Caustics Feature in D5 Render
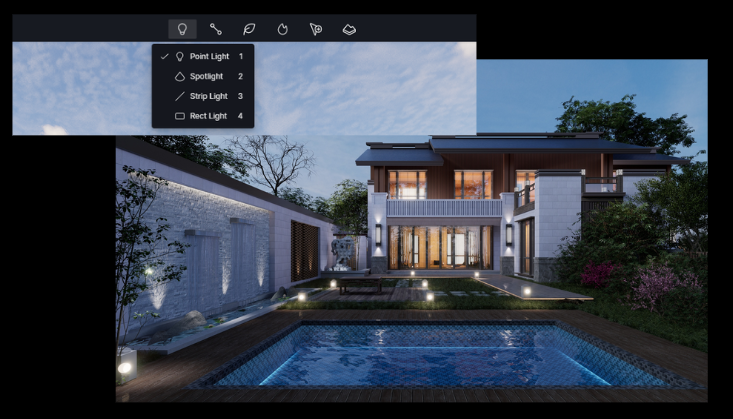
D5 has added a real-time caustics feature, allowing you to easily enhance your scenes with realistic lighting effects. You can enable caustics with just a few clicks—no advanced settings required. D5 Render also supports several light sources, including point, spotlight, strip, and rectangular lights. These lights can cast realistic caustic patterns when used with materials like 'water', or 'transparent'. Reflective caustics work with custom materials, while water and transparent surfaces support both reflective and refractive effects.
2.3 D5 Render’s Technical Approach to Real-Time Water Caustics
D5 Render achieves these real-time water caustics through a technique known as photon mapping. This method simulates how individual light particles, or photons, move through a scene—how they reflect off surfaces, bend through water, and finally land on objects to create those shimmering, natural light patterns. What makes D5 special is how it balances accuracy and performance. You get instant feedback in your viewport, so you can tweak lights or materials and see the results right away. This speeds up your workflow and lets you make confident creative choices.
When it’s time for a final render, D5 automatically boosts the accuracy and quality of the caustic effect. So even though the real-time preview is optimized for speed, your exported images or animations will still deliver impressive, photorealistic lighting details.
2.4 Comparative Analysis: D5 Render vs. Traditional Rendering
When working with traditional renderers like V-Ray or Arnold, setting up water caustics can be time-consuming and complicated. You often have to manually adjust dozens of parameters and wait hours to see the final result. These tools rely heavily on photon mapping or ray tracing, which, although accurate, can slow down your workflow significantly—especially if you're aiming for real-time feedback.
The table below provides a more specific comparison:
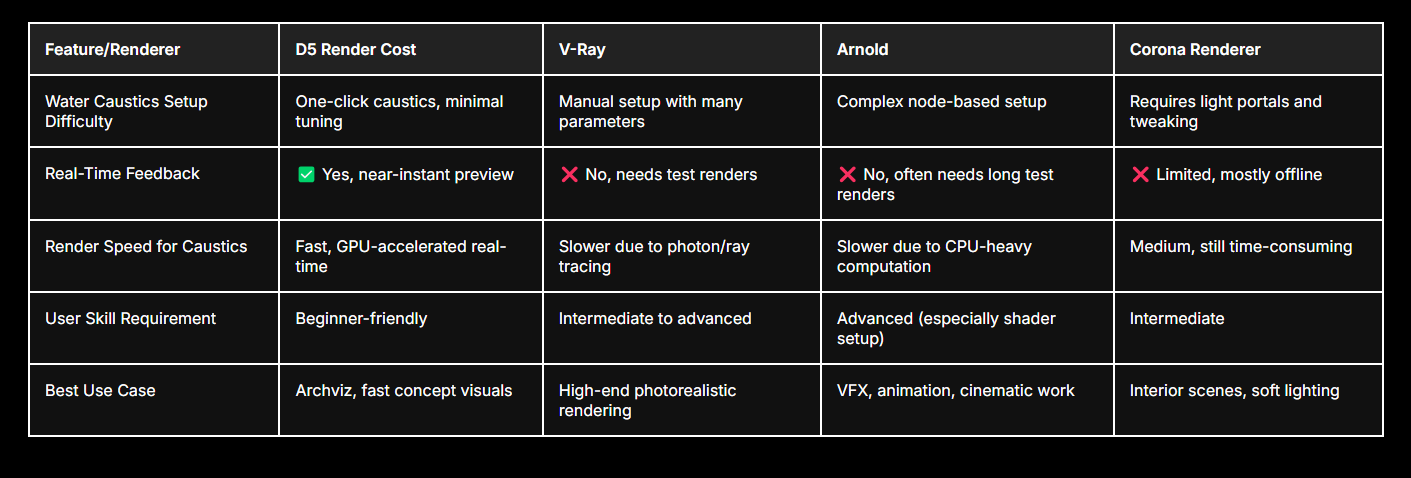
With D5 Render, the process becomes much easier, caustics can now be turned on with just one click” for supported light sources and materials. Whether you're working with point lights or transparent water surfaces, you can instantly visualize the water caustics in real time—without all the guesswork.
Many users praise D5’s intuitive setup and fast feedback. In the D5 forum, one user shared:
'I used to avoid adding water caustics because of the render time, but with D5, I can actually experiment with them freely.'
🔔 Experience the Free D5 Render Immediately!
How to Creat Water Caustics in D5 Render
3.1 Step-by-Step Guide
Creating realistic water caustics in D5 Render can really take your scene to the next level. If you're new to this, don’t worry—I’ll walk you through every step in a clear and simple way.
A. Set Up Your Scene with Water
First, make sure your scene has a water feature—like a pool, fountain, lake, or even a puddle. Anything with a water surface will work.
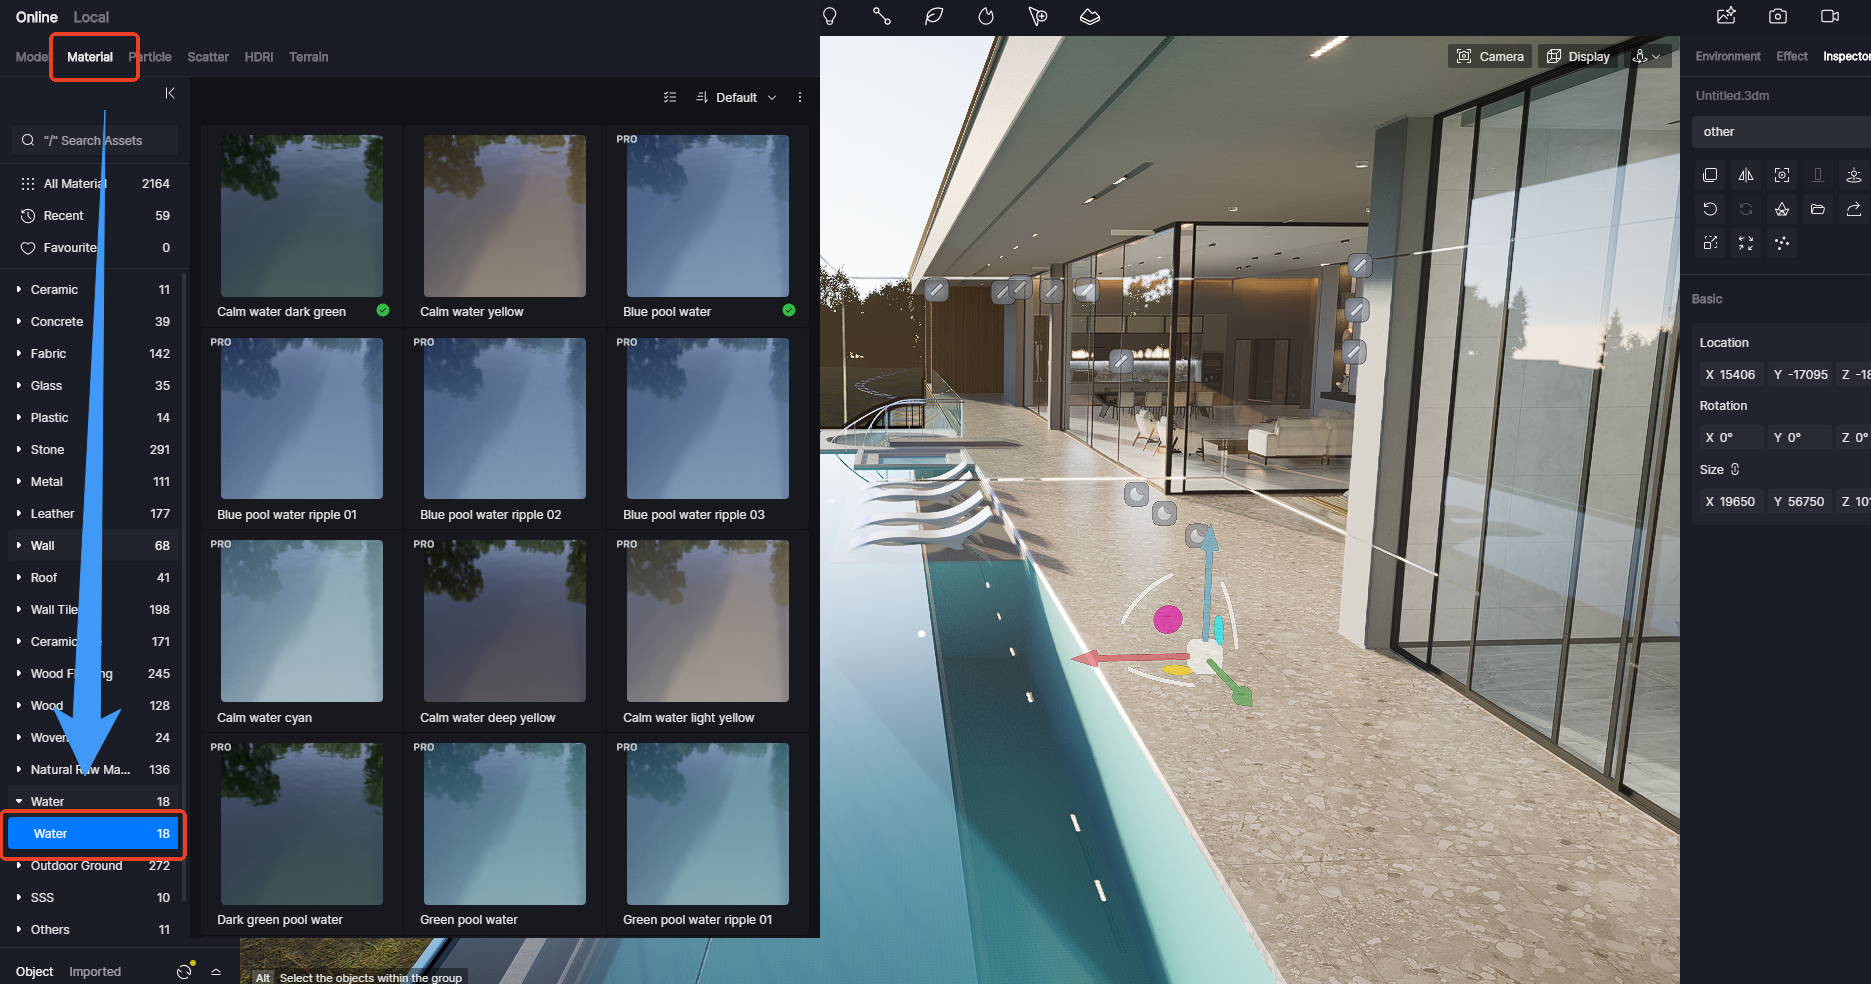
Then, go to the Material Library in D5 and apply the built-in 'Water” material to those surfaces. If you want a more custom look, you can open the Material Editor and tweak it to suit your style. D5 makes this pretty intuitive, even for beginners.
Note: The swimming pool needs a bottom, and the water surface should be a single-sided model.
B. Set the Light Source
Water caustics need light to work their magic. Add some Point Lights or Spotlights to your scene. You can find these in the lighting section of the toolbar.
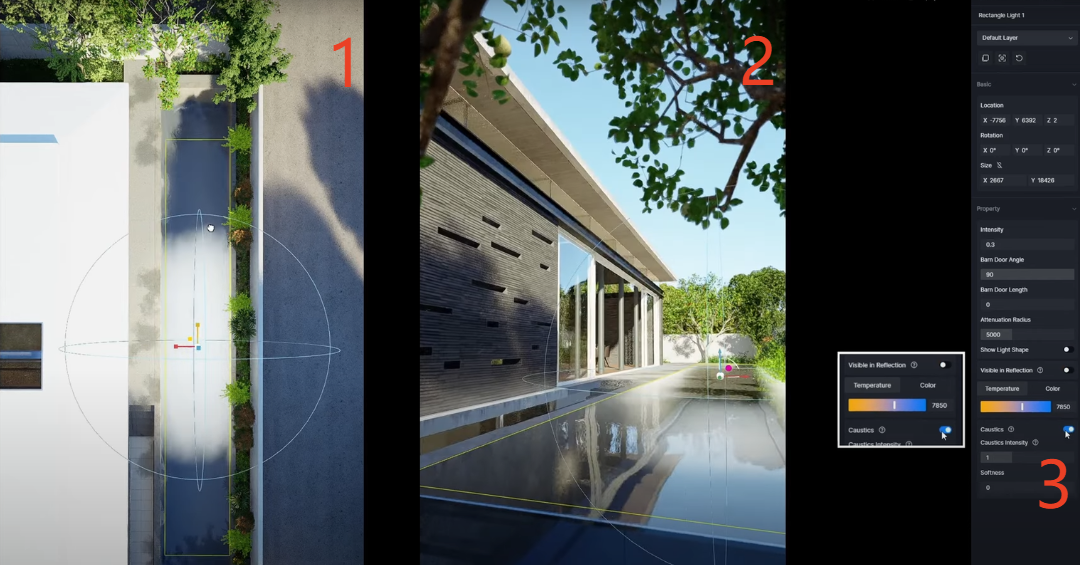
Once you’ve placed a light, click on it to open its Settings Panel. Here’s the important part:
👉 Enable the 'Caustics” option.
This tells D5 to simulate how light bends and scatters through the water—this is what creates those gorgeous dancing light patterns on nearby surfaces.
C. Enable Caustics in the Water Material

This step is just as crucial. Select the water material you applied earlier. In its settings, you’ll see a checkbox or toggle for 'Caustics.” Make sure it’s turned on!Now you’ll have access to additional options, like:
- Intensity – controls how strong the light effects are.
- Softness – adjusts how sharp or blurry the caustic patterns look.
Play around with these sliders until the water looks just right. You might want a soft, dreamy shimmer or a bright, dynamic sparkle—it’s all up to you!
Note: The normal map controls the look of patterns while flow velocity influences the wave speed.
D. Uther Adjustment
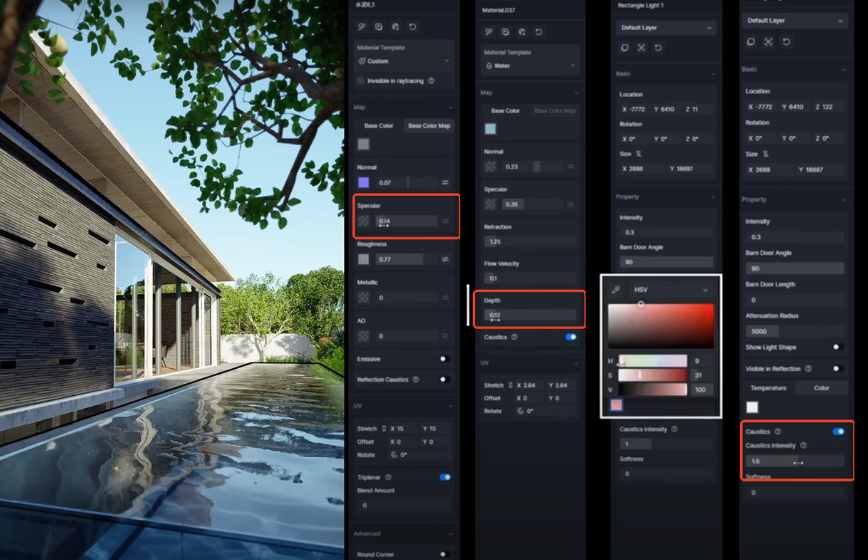
- Reduce Material Specularity for Better ClarityTo make underwater caustics more visible, consider lowering the specular value of the pool bottom’s material. A less reflective surface helps the caustic patterns stand out more clearly.
- Keep Water Depth LowCaustics become harder to see as water gets deeper. For a more pronounced effect, set the water depth to a relatively low value so that light can travel through more effectively.
- Adjust Light Color to Influence Caustic HueThe color of the caustics is directly affected by the light source. Try experimenting with different light colors to create unique caustic moods and underwater atmospheres.
- Control Caustic Spread with Light DistanceThe distance between the light source and the water surface plays a big role in how far caustics will spread. Moving the light closer or farther can change the size and intensity of the light patterns.
- Fine-Tune Brightness and SoftnessIncreasing the scattering intensity will make the caustics appear brighter and more vibrant. Meanwhile, adjusting the softness setting controls how sharp or diffused the edges of the caustic patterns appear.
🔔 Experience the Free D5 Render Immediately!
3.2 Tips for Enhanced Realism in Water Caustics
To achieve more realistic water caustics, start by incorporating normal maps. These maps add intricate surface detail to the water’s texture, helping to break up the light as it passes through, creating more organic, natural patterns. This subtle touch can significantly enhance the appearance of the caustic light, making it feel more authentic.
Additionally, consider animating both your water and light sources. Real-world caustics are never static—water is constantly moving, and the light shifts over time, causing the caustic patterns to evolve. By animating these elements, you can mimic this behavior and bring a greater sense of life to your scene.
.gif)
For an even deeper level of realism, combine this with volume lighting techniques and weather effects. Adding volume lighting can help simulate the way light interacts with particles in the water, such as mist or fog, creating a more atmospheric look. Weather effects like rain or waves can further enhance the dynamic nature of the scene, making it feel like the environment is alive and constantly changing. When combined, these elements can take your visuals from realistic to truly immersive.
⏸ How to Create Realistic Caustics in Rendering | Glassware, Be Water Lamp, Swimming Pool →
🔔 Experience the Free D5 Render Immediately!
Advantages of D5 Render in Handling Caustics
If you’ve ever tried rendering water caustics in traditional software, you know how tough it can be. Setting up realistic lighting, fine-tuning materials, and waiting hours for a final render is not just time-consuming—it’s frustrating. That’s where D5 Render changes the game. Let’s break down why D5 makes working with water caustics faster, easier, and way more fun.
4.1 User-Friendly Interface
First off, D5 Render is designed with simplicity in mind. You don’t have to dig through endless settings or use third-party plug-ins just to get caustics working. With just a few clicks, you can turn on the caustics effect in your light source settings and assign compatible materials like 'water' or 'glass'. 'Users can simply toggle the Caustics switch on applicable lights and see the result instantly.' That means less technical headache and more creative freedom—especially helpful if you're not a rendering expert.

4.2 Real-Time Rendering
Unlike most traditional renderers that require long waiting times, D5 gives you real-time feedback. This is huge. As you move your light or adjust your water material, you’ll instantly see how the water caustics change in your scene. This is possible thanks to D5’s GPU-powered engine, which is built for speed and visual accuracy. D5 Render introduced real-time caustics as a core feature, so you’re not sacrificing quality for convenience.
4.3 Optimized Performance
You don’t need a monster machine to use D5. The software is optimized to balance quality and speed, making it accessible even if your PC isn’t high-end. D5 Render is 'built to deliver smooth workflows and stunning results, even on moderate hardware.” So if you’re working on a laptop or an older rig, you can still create beautiful, light-filled water scenes without crashing your system.
🔔 Test Your System's Performance Now →
4.4 Integration with Other Effects
One of the coolest things about D5 is how well water caustics work alongside other effects. You can mix caustics with features like volumetric lighting, animated water surfaces, or even real-time weather effects. The result? Deeply immersive environments that don’t just look good—they feel real. Everything blends seamlessly, which helps tell a better visual story whether you're working on an architectural project or a product showcase.

🔔 Experience the Free D5 Render Immediately!
Conclusion
Understanding and applying water caustics in your 3D scenes can make a huge difference in how real and engaging your renders look. These light patterns help bring scenes with water or glass to life, adding that extra layer of detail that makes your work stand out.
With D5 Render, you don’t need to stress over complicated setups. If you’re serious about improving your renders, now’s the perfect time to explore what D5 Render can do. Try adding water caustics to your next project—you’ll see just how much they elevate the final result.
🔔 Experience the Free D5 Render Immediately!
Continue Reading About More Features in D5 render
What's Global Illumination and Why We Need It
What is Real-Time Path Tracing in D5 Render 2.10 and Why Does It Matter?
D5 Render 2.10 Beta Integrates NVIDIA DLSS 4: AI Revolution in Real-Time Rendering
The Easiest Way to Create Stunning Phasing Animations
Mastering Architectural Landscaping with D5 Render Terrain Tool
Mastering AI-Powered Lighting in D5 Render for Realistic ArchiCAD Visualization
FAQs on Water Caustics in D5 Render
1. What causes inaccurate or distorted water refraction in D5, and how can it be fixed?
Water refraction issues usually stem from incorrect model setup. Make sure the water material is applied to a single-sided surface. Also, fine-tuning the depth parameter of the water material can help achieve a more physically accurate appearance.
2. Why does the water surface in D5 appear flat or visually unappealing?
This typically results from insufficient surface detail. Users should enhance the water material by adjusting the normal map settings, which control the appearance of ripples and waves. Increasing the normal intensity can significantly improve visual fidelity.
3. Why do white highlights or visual artifacts appear during animation renders involving water?
This issue often arises from inconsistent lighting or shader behavior between static and dynamic frames. Ensure that lighting settings remain stable throughout the timeline, and avoid extreme refraction values. If the problem persists, contact D5’s support team for further assistance.
4. What causes the water material to render incorrectly or not at all?
Always apply the water material to a single-sided model, as D5 does not support backface rendering for transparency. In some cases, placing a ground plane just below the water surface can help maintain optical consistency and prevent rendering glitches.
5. Why are water caustics not visible on the bottom of pools or underwater surfaces?
This is usually due to insufficient lighting intensity. Caustics effects require strong directional lighting, typically from the sun or high-powered artificial lights. Increasing the light strength and adjusting the angle can make caustics more pronounced.
🔔 Still Need Help? D5 Forum, Help Center, D5 Facebook Group →


